

Introduction
Hello and welcome to Tesoract. Tesoract is a powerful tool designed to help teams align, track and achieve their strategies effectively. No matter the size or structure of your team, Tesoract effortlessly streamlines streamlines your strategy execution process.
Key Features:
- Strategy: Define your strategic priorities and align all initiatives and workstreams under them.
- Idea Hubs: Collaborate in shared spaces where teams can generate, discuss, and prioritize impactful ideas.
- OKRs: Set clear Objectives and connect them across every level of your organization. Measure success with meaningful Key Results.
- Projects: Plan and execute projects that move your strategy forward, using any project management framework that fits your team.
Why Tesoract?
Strategy is hard, especially when it stays at the top of the organization and disconnected from the day-to-day. Traditional solutions fragment strategy across slides, spreadsheets, and siloed apps, making alignment and follow-through nearly impossible. Tesoract changes this by integrating strategy, OKRs, projects, and ideas into one cohesive platform, ensuring visibility, alignment, and continuity across the organization.
Strategy as the foundation: In Tesoract, a "Strategy" is the first you'd create. All work items such as ideas, OKRs and projects live under strategies.
Seamless Execution: Tools that offer stand-alone goal management or project management check a box. However, their utility stops when a strategy wide view is needed. Tesoract enables seamless strategy execution through OKRs and projects directly aligned under strategies. Simply, there can never be an unaligned OKR or project. You no longer have to switch between apps or settle for sub-standard OKR features in a project management app or vice-versa.
Collaboration & Ideation: A strategy is a long term experiement, a hypothesis that a set of choices will yield a position of advantage. Strategy requires ongoing input and adaption. Tesoract's idea hubs provide a shared space for teams to contribute, evaluate and prioritze ideas, all within the context of your strategy.
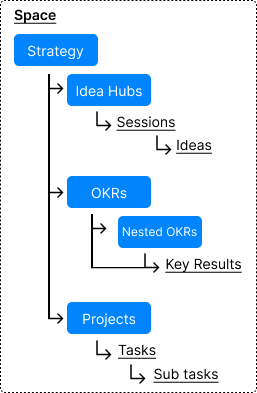
Tesoract structure overview
At the highest level in the structure are "Spaces". Think of "Spaces" as your organization or team. Inside spaces are "Strategies". Inisde each strategy, you will find Idea Hubs, OKRs and Projects.
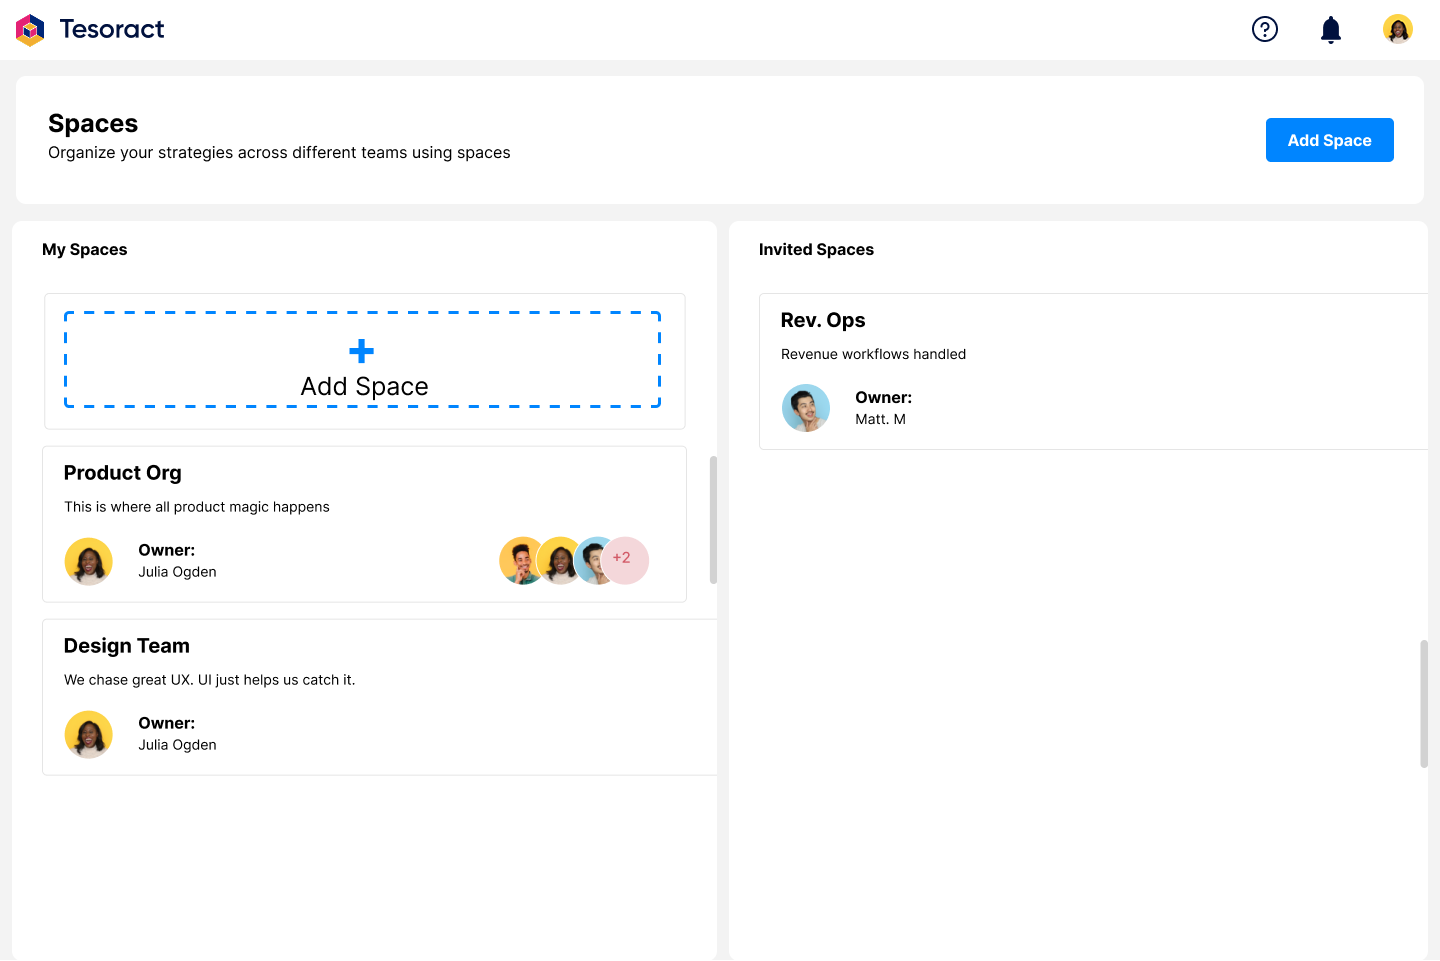
Spaces
Once you login to Tesoract, you will see the spaces page. "My Spaces" are spaces you own and "Invited Spaces" are spaces you've been invited to.
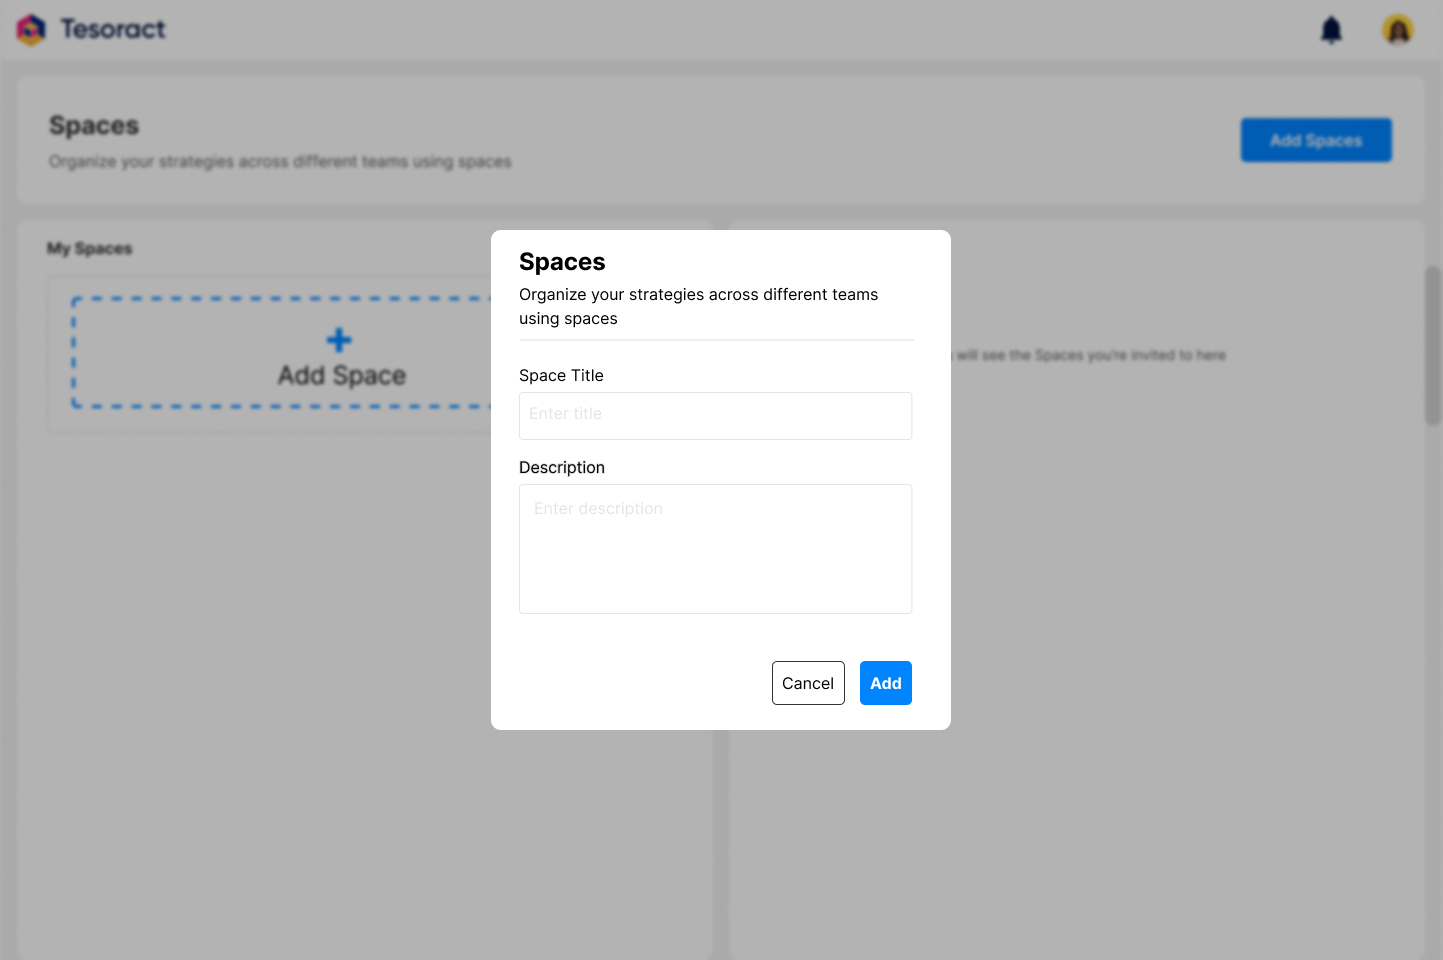
Add a Space
To add a new space, click on the "Add Space" button, and in the following pop-up, give your space a name and a description. Remember your space is akin to your organization or team. Giving a clear name and description will help convey the purpose of the space.
From the all spaces page, click on the space you'd like to enter.
Inside Space
You are now inside your space. Here, you will see space's details, the members and all the strategies in this space.
.png)
Adding Members to the Space
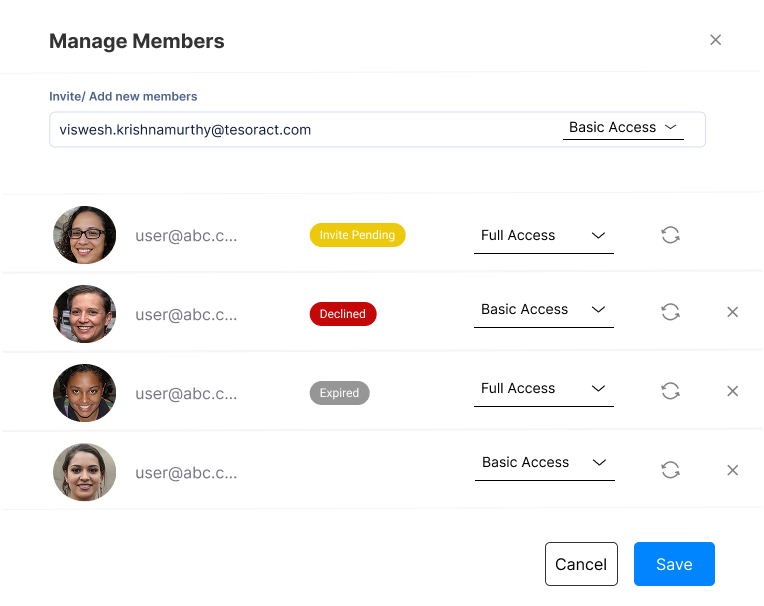
You can add members at all levels, from space all the way down to a specific task in a project. Members you invite at the space level, will have access to all strategies in the space and all work items within those strategies. To add members, click on the “+members” button and in the following pop-up, enter email addresses of your invitees, choose the desired access level and click on save. All members can either have “Full Access” or “Basic Access”. Full Access members enjoy full privilege and visibility at the space level, meaning they can edit the space, add or edit the members list, add or edit strategies and the work items within strategies. Basic access members can view all strategies and the work items within strategies, but cannot edit the space, add/edit the members list at the space level. Learn more under "Access".
Strategy
To add a strategy, click on the "Add Strategy" button. In the following pop-up, give your strategy a title, description, re-assess by date (optional) and a category (optional). Giving your strategy a clear title and description will help your team understand and contextualize their work within the strategy. Setting a “re-assess by” date can serve as a reminder to check your strategy for continued suitability to changing conditions. Assigning an existing category or adding a new category helps group strategies together. For eg, all your revenue strategies can be grouped under a “Revenue” category.

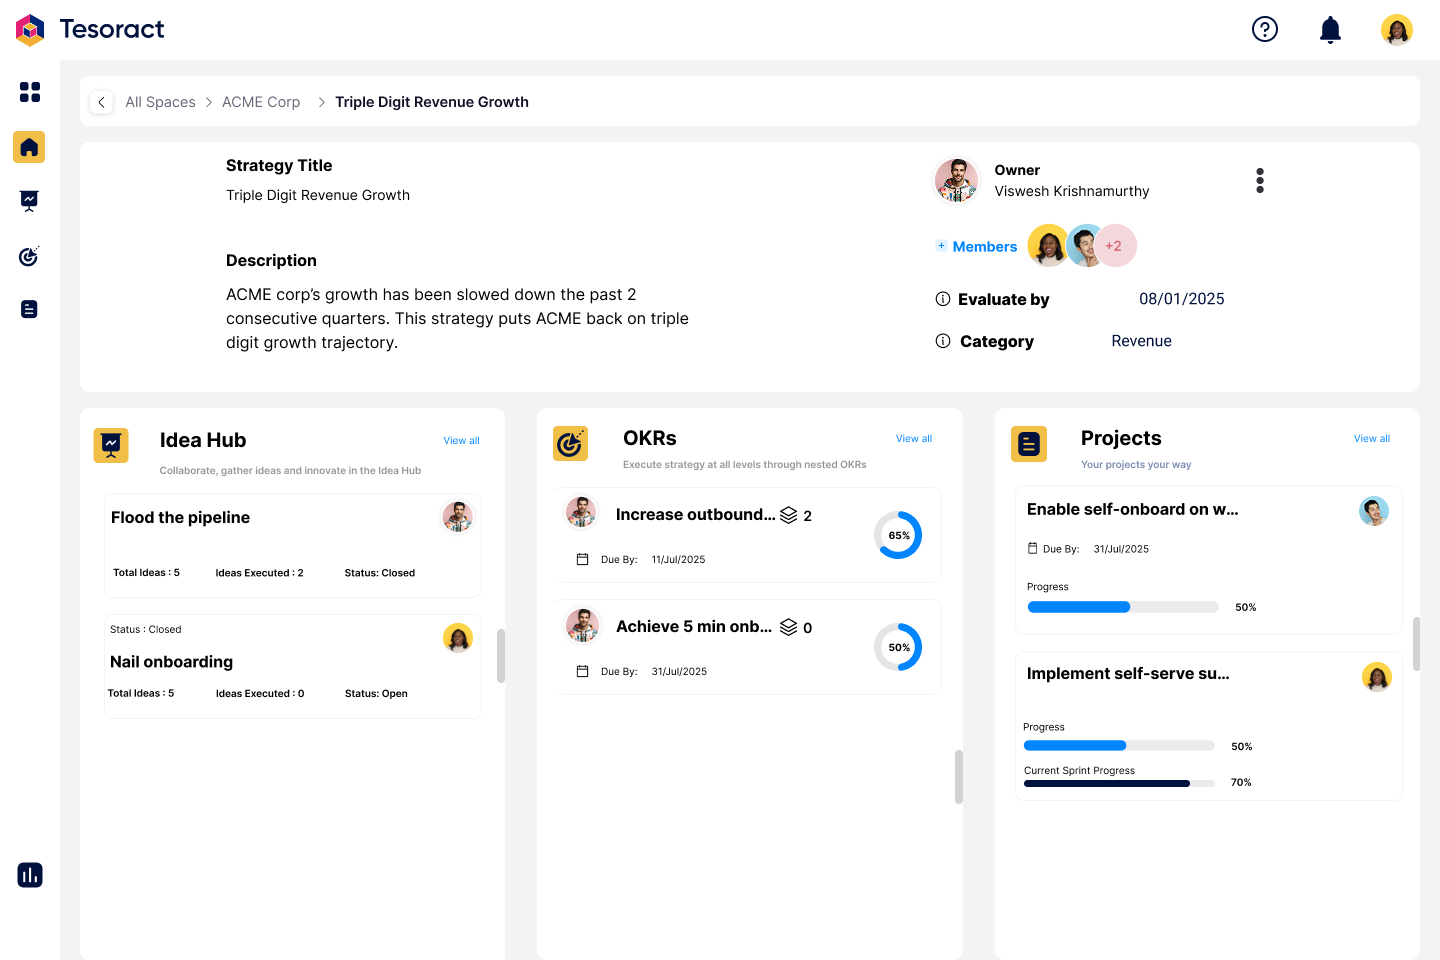
Inside Strategy
Click on the strategy you want to enter into and you'll see the strategy header and quick peek panels for Idea Hubs, OKRs and Projects, the work items under each strategy. All members of the space will gain access to all strategies within the space. If you add new members at this level, they will have access to only those strategies they are invited to. Members added to the strategy will have access to all work items (ideas, OKRs, projects) within the strategy. Learn more about full and basic access under the "Access" section.
All members of the space will gain access to all strategies in the space. You may specifically add members to the strategy, if you want such members to have access only to that particular strategy. Keep in mind, members added to the strategy will have access to all work items (ideas, OKRs, projects) within the strategy. Learn more about full and basic access under the "Access" section.
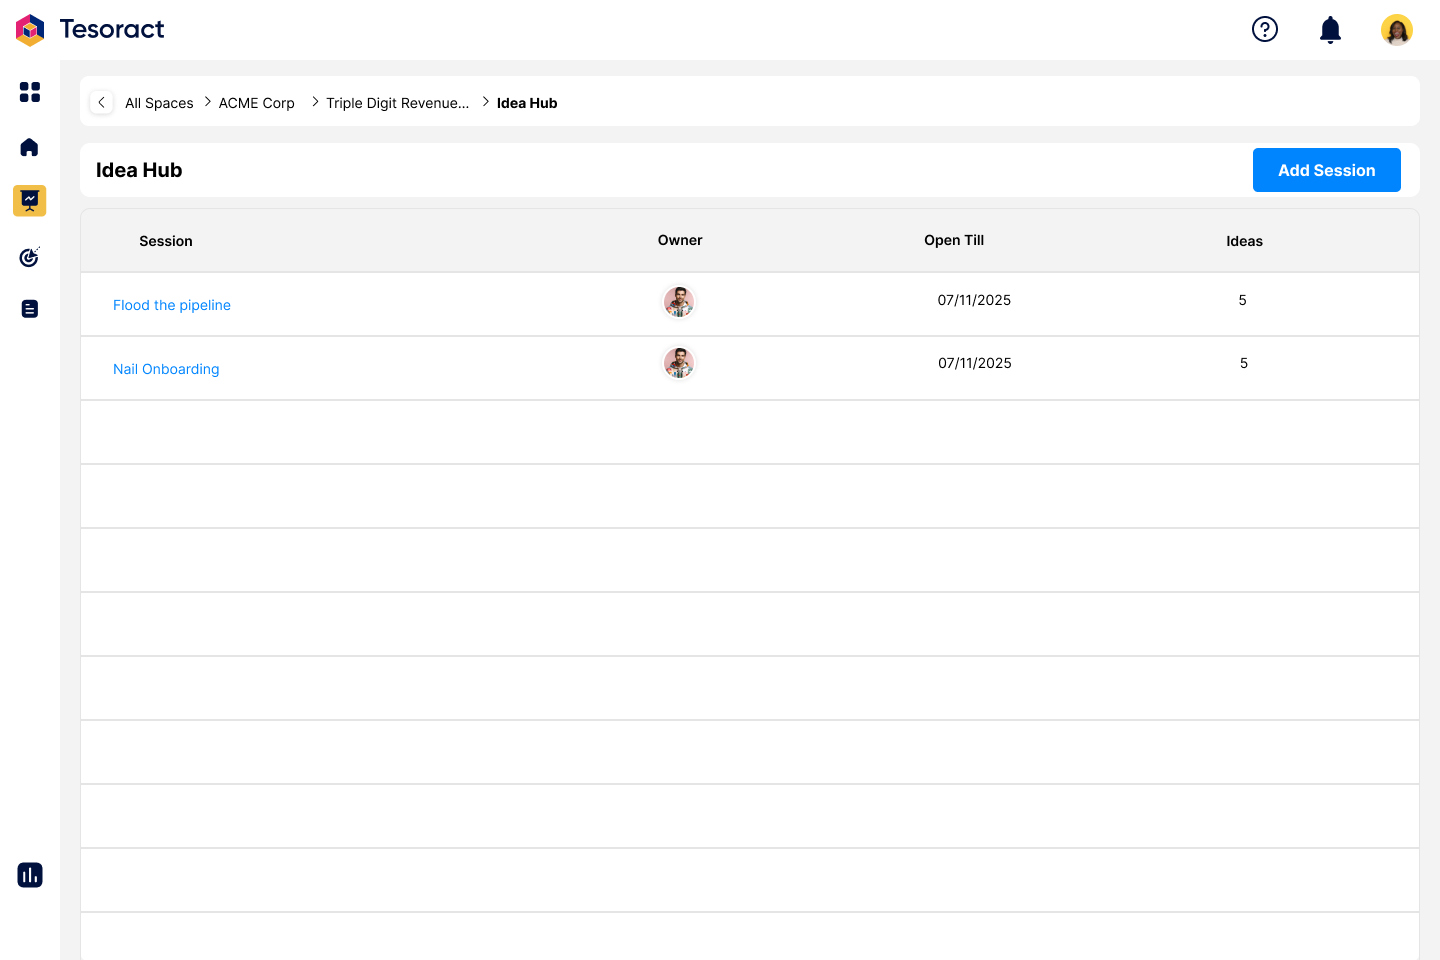
Idea Hubs
Idea hubs allow you to collaborate with your team, collect, evaluate and prioritize ideas. You can navigate to Idea Hubs from either the "Idea Hubs" icon from the side bar or from the quick peek panel.
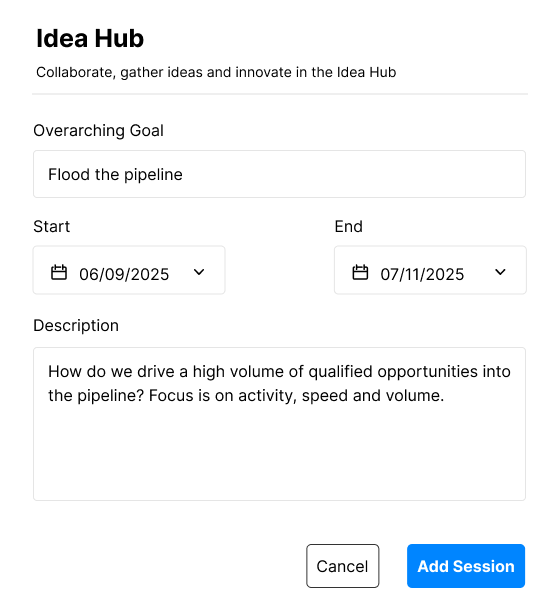
Add an Idea Session
To add a new session, click on the "Add Session" button. Give your session an overarching goal, description, start and end dates. The overarching goal is the very purpose of the idea session. Writing a clear overarching goal and description will help you collect quality ideas.
Entering your Idea Session
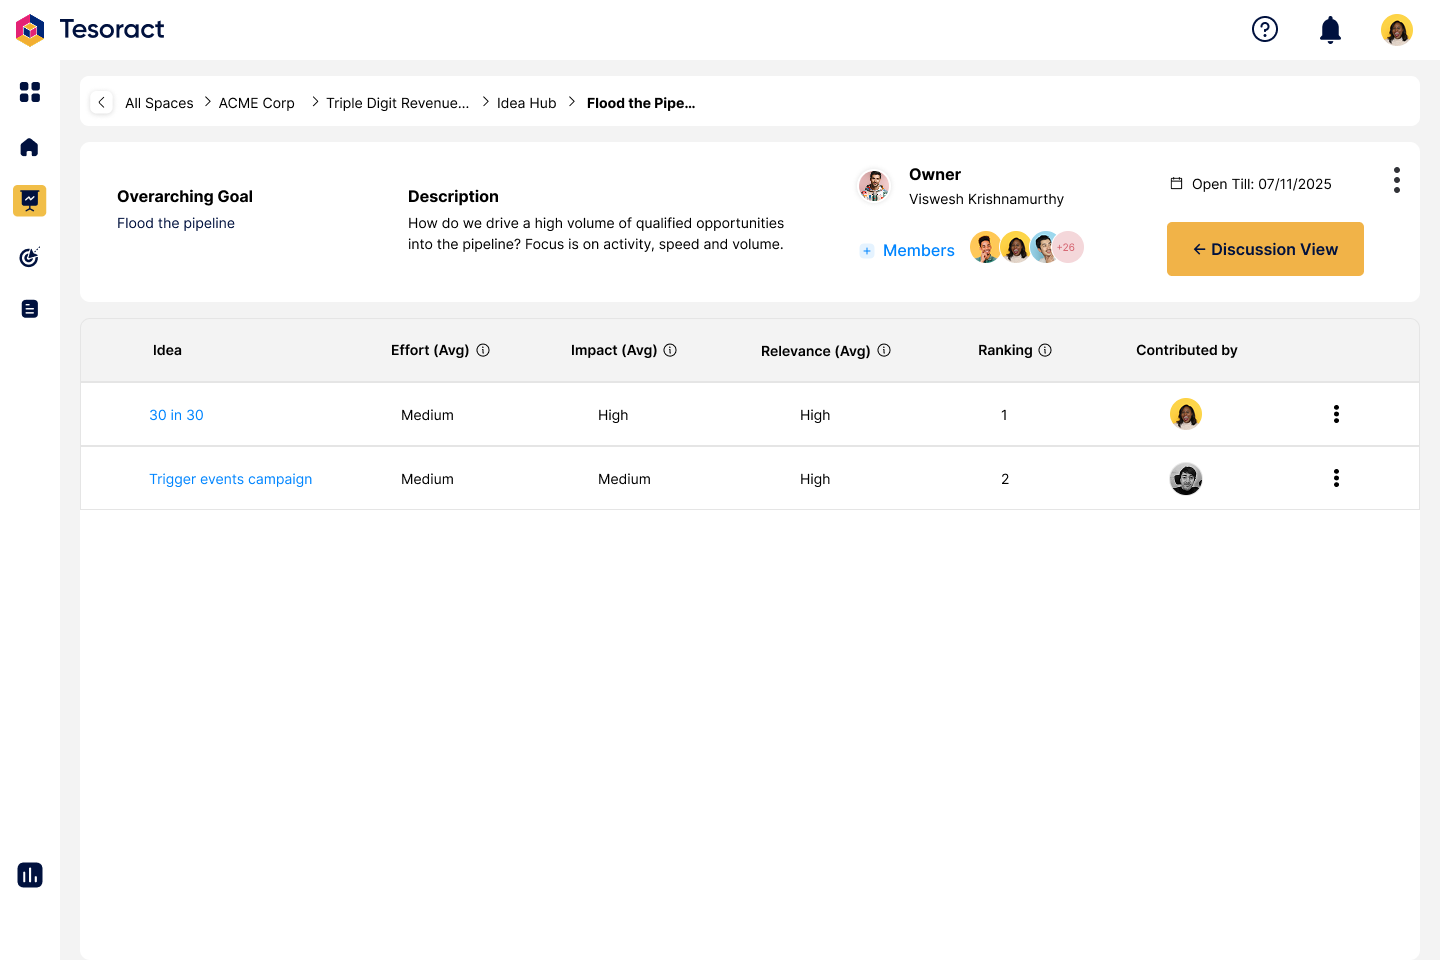
Click on the idea session you would like to enter. Once you are in, you will see the session details on the header and ideas in the bottom. All members of the strategy will gain access to all Ideas, OKRs and projects within the strategy. If you add new members to this Idea, they will have access to only those Ideas they are invited to and not to any other Ideas, OKRs and Projects within the strategy.
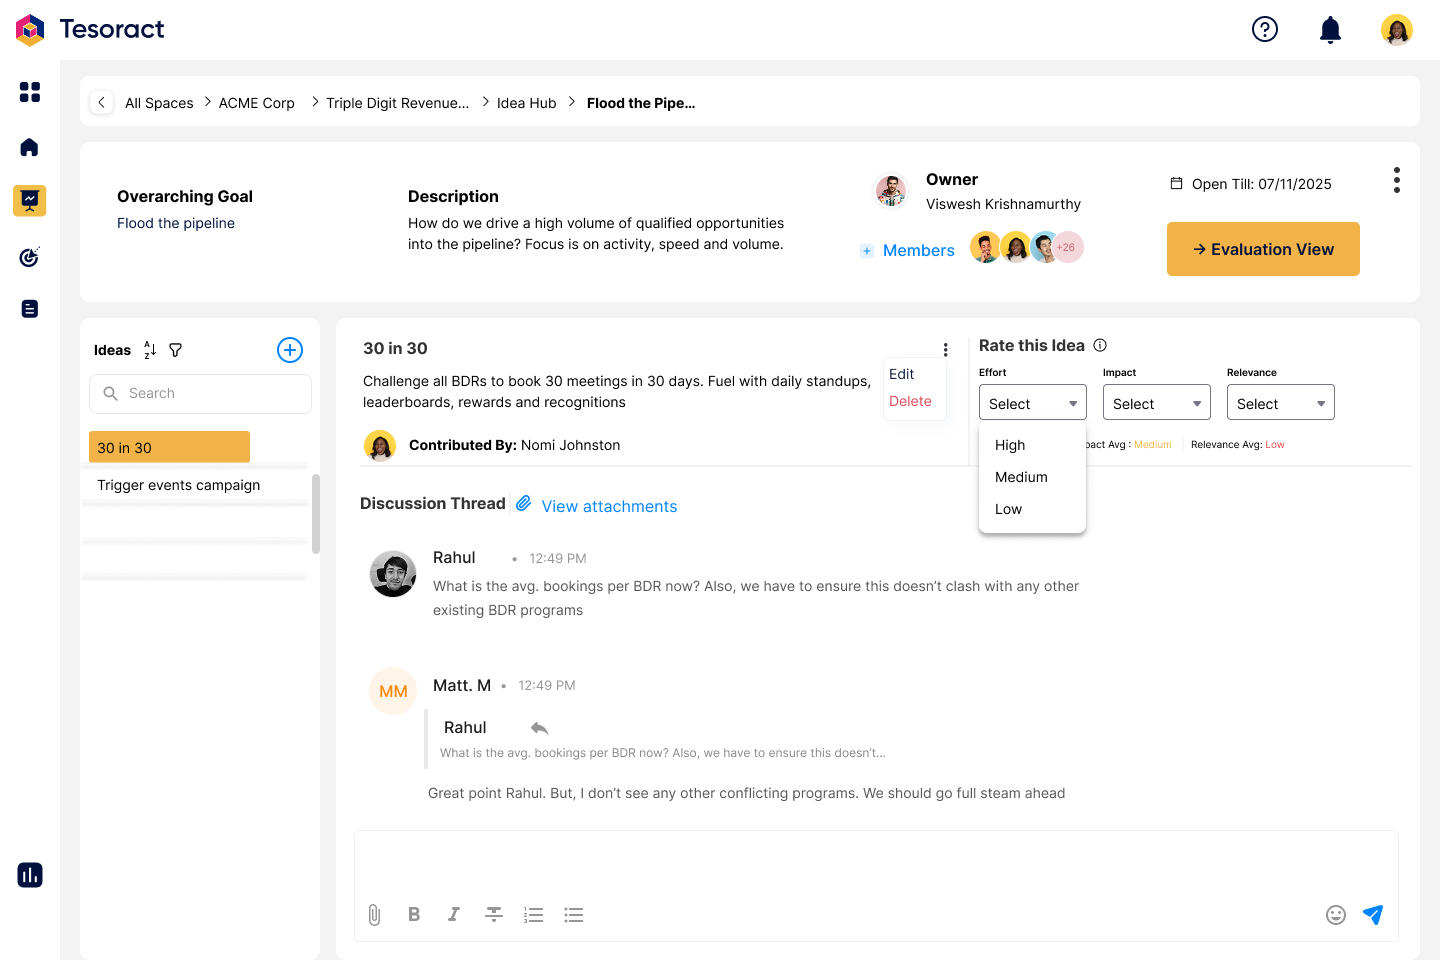
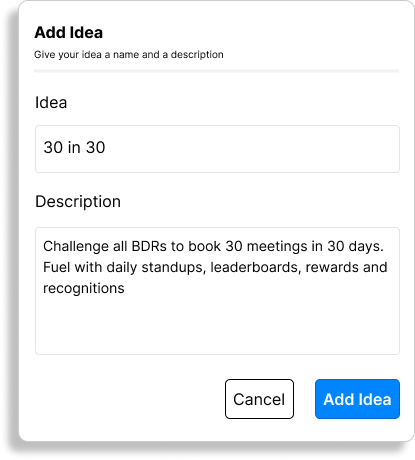
Add an Idea
To add a new idea, click on the "+" icon at the top of ideas list. In the following pop-up, give your idea a title and description and click on "Add Idea".
Participating in Ideas
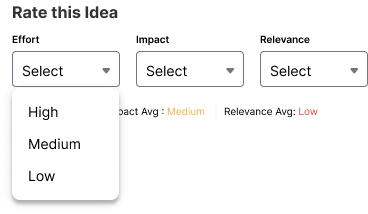
Each idea has a dedicated discussion thread. All members in the session can discuss, debate and collaborate on each idea. Data and documents to support each idea can be attached in the discussion thread. Members can also rate each idea on "Effort", "Impact" and "Relevance" parameters.
Evaluation View
At any time, you can switch to the "Evaluation View". The "Evaluation View" shows all ideas ranked by their cumulative average of "Effort", "Impact" and "Relevance" scores. The idea with the lowest effort, highest impact and highest relevance score will be ranked 1.
OKR
OKR - Objectives & Key Results is a powerful framework to execute strategy. By breaking down strategy into actionable and quantifiable key results, OKRs help teams make meaningful progress towards the strategy. You can navigate to OKRs from either the "OKRs" icon from the side bar or from the quick peek panel.

Add an OKR
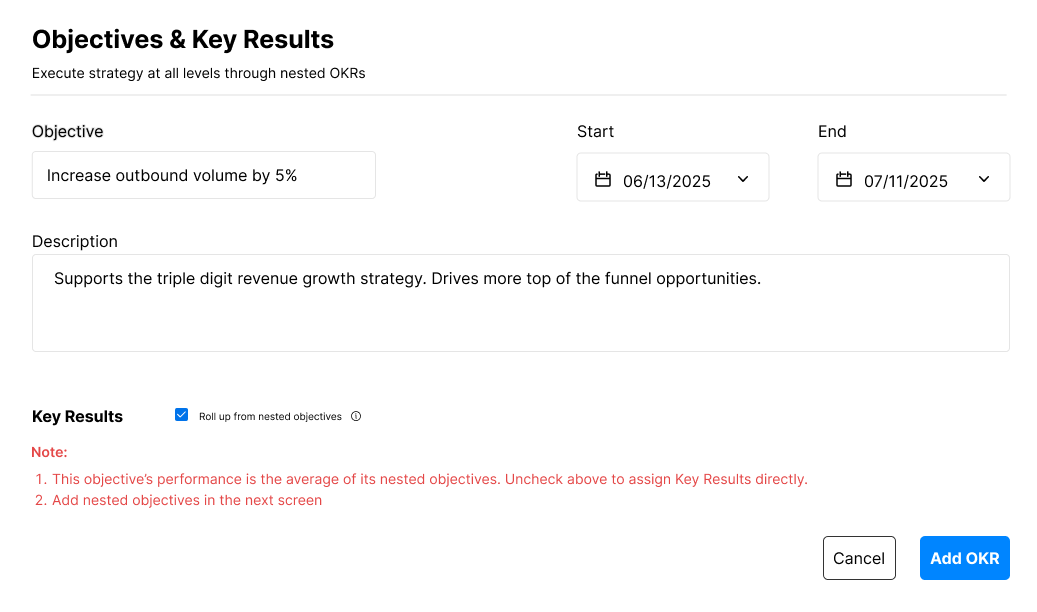
To add an OKR, click on the "Add OKR" button. The following up pop-up shows the fields necessary to create a new OKR. Each OKR has two parts to it, the "Objective" part and the "Key Results" part. The "Objective" is a clear, inspiring goal that sets direction. The "Key Results" are the measurable outcomes that define success against the objective.
Every OKR must have a title for the objective, start and end dates, an optional description. An objective can be measured through its own Key Results or through its nested objectives if any. A Key Result must have a statement explaining outcome or metric, an optional current value of the metric, the target value of the metric, a toggle to define whether the metric is being measured in numbers or in percentage and finally, the frequency in which the OKR will be updated. Below is an example of an OKR with all the necessary details to be created. An objective can have multiple key results. Should you decide to have more than 1 key results, click on "Add Key Result" below to Key Result section. This adds another Key Result row.
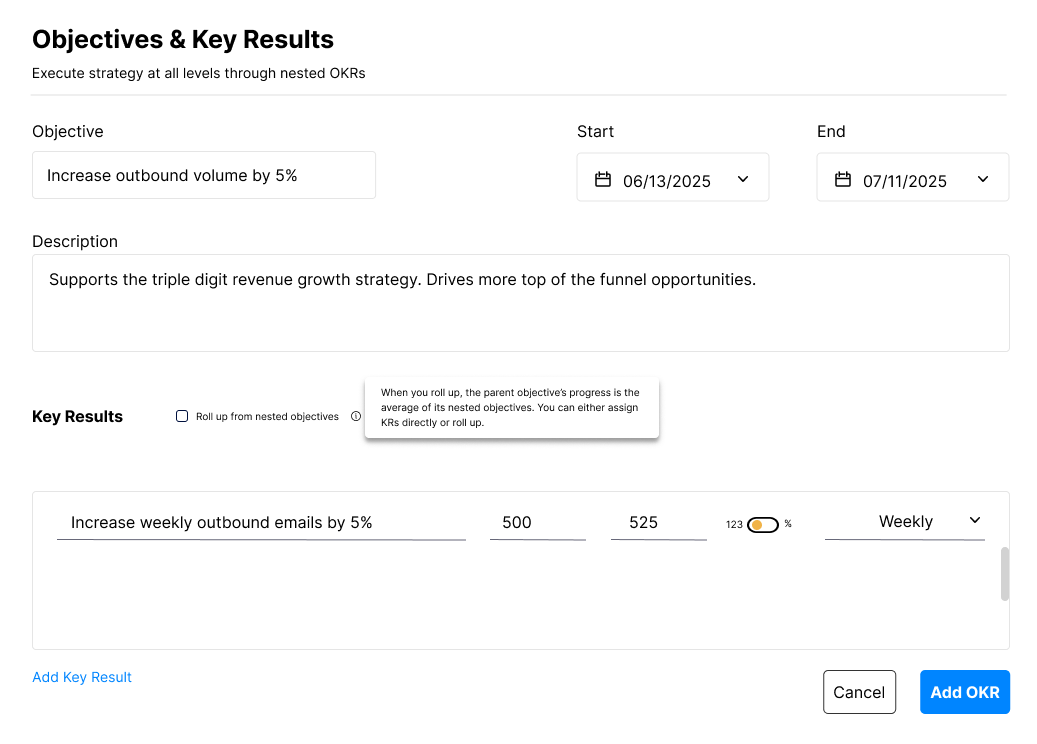
Roll up from Nested Objectives
Should you decide to track the OKR through its nested objectives, simply click on the checkbox as shown below. This way, the Objective will not have any key results directly linked and instead will be a "roll-up" or cumulation of its nested objectives.
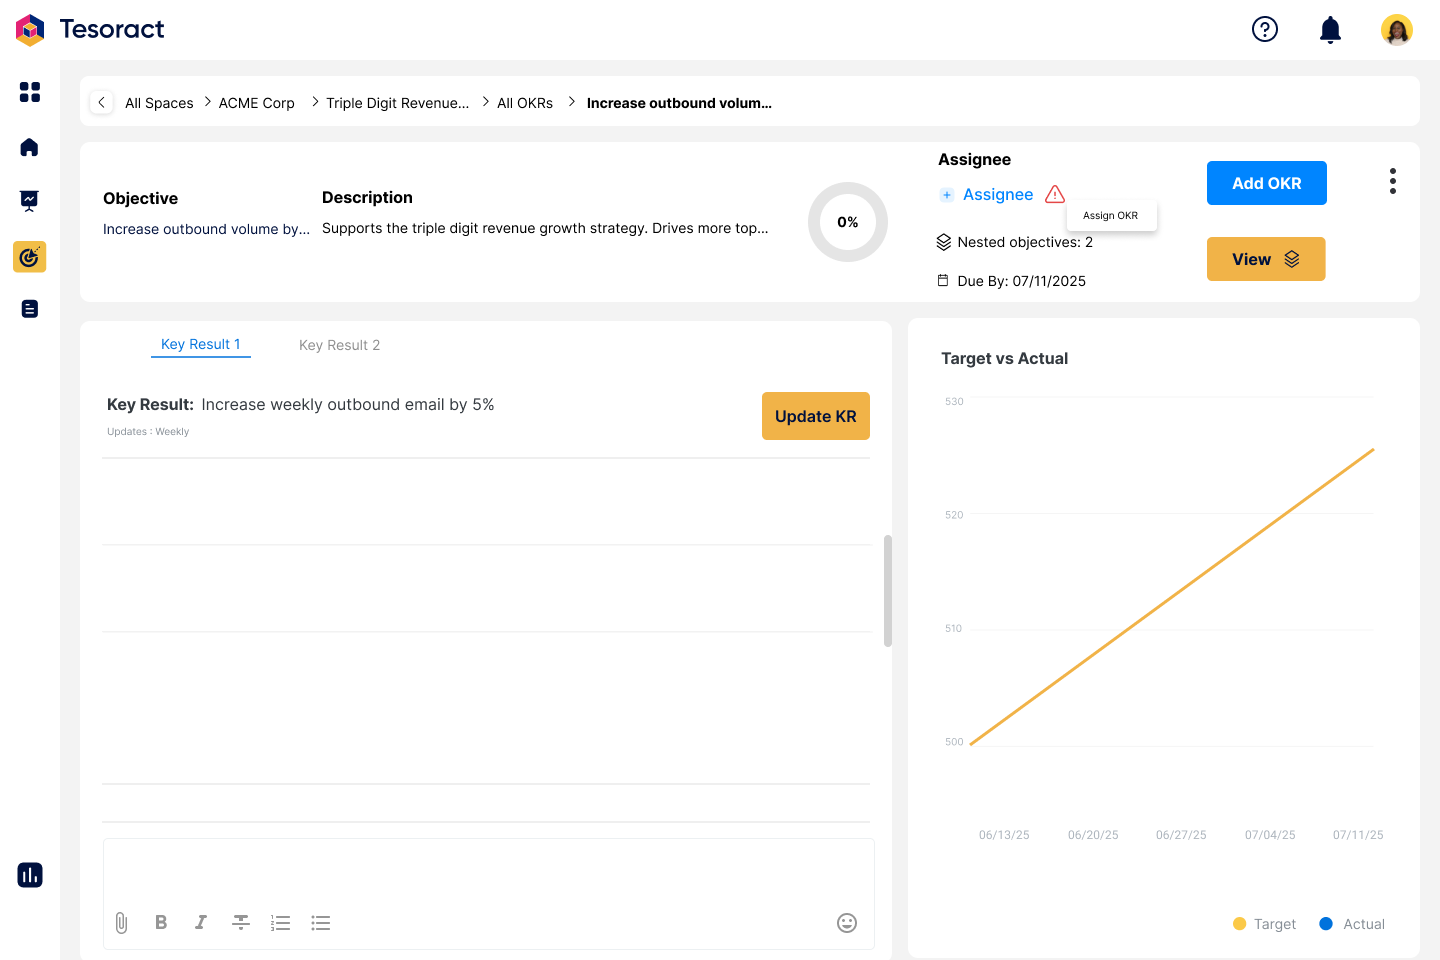
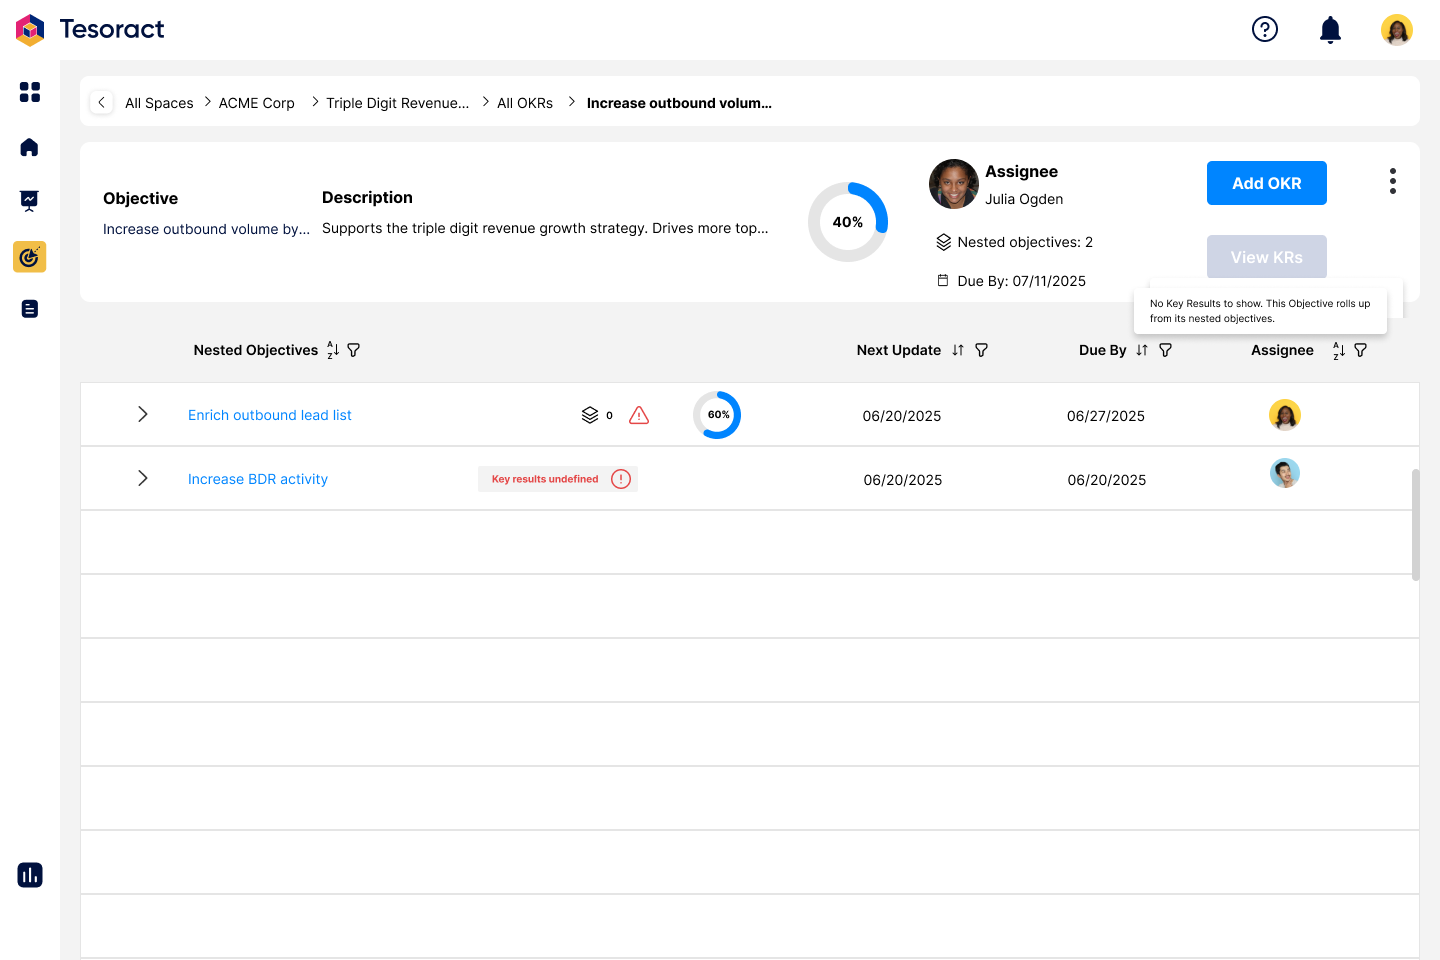
From the All OKRs page, click on the OKR you want to enter into. Once you are in, on the top you will see the objective details, progress ring, the assignee and due date for the OKR. You can add nested OKRs by clicking on the "Add OKR" button from within an OKR. You can view all such nested OKRs by clicking on the view nested OKRs button. In the bottom of the page, you will find a discussion thread and a chart showing progress against target for each key result. If your OKR has multiple key results, they will be available in separate tabs.
Assigning OKRs
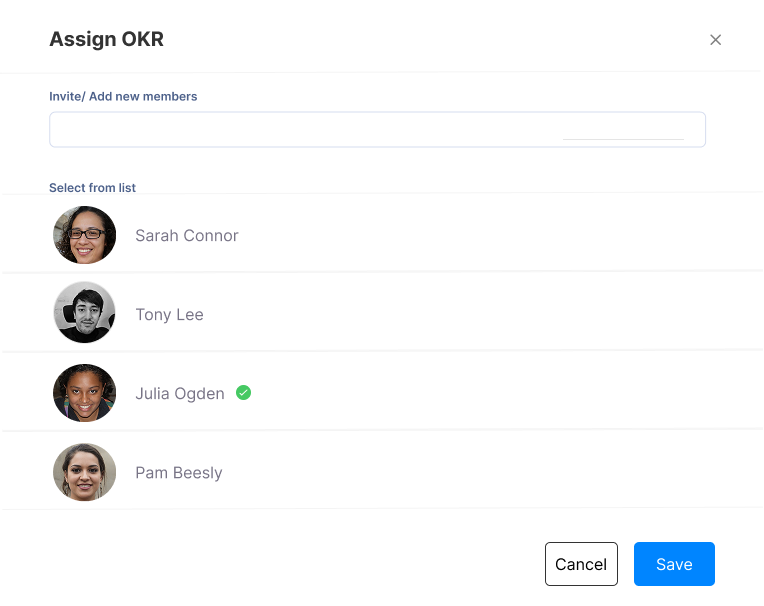
OKRs can be assigned to all members that have access to the strategy or the space. Alternately, you can invite a new member and assign to them. Such newly added member will gain access to the OKR they are assigned to, its children, its parent strategy and the space but not to other Ideas, OKRs or Projects. To assign the OKR, click on the assignee button. In the following pop-up, hover against the name of the desired assignee and "Set as Assignee". Once assigned, you will see the green check mark and then click save to complete assigning.

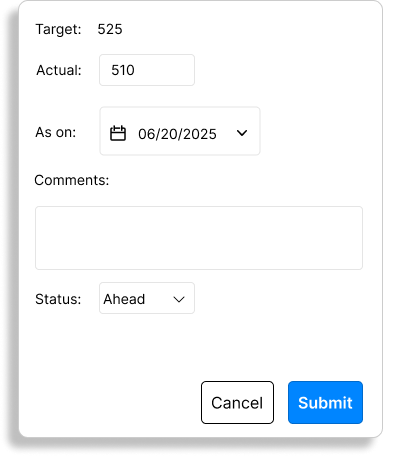
Updating KRs
Each key result is updated based on the update frequency defined at the time of OKR creation. Every KR update can be seen in the discussion thread, in the progress chart and in the overall OKR progress.
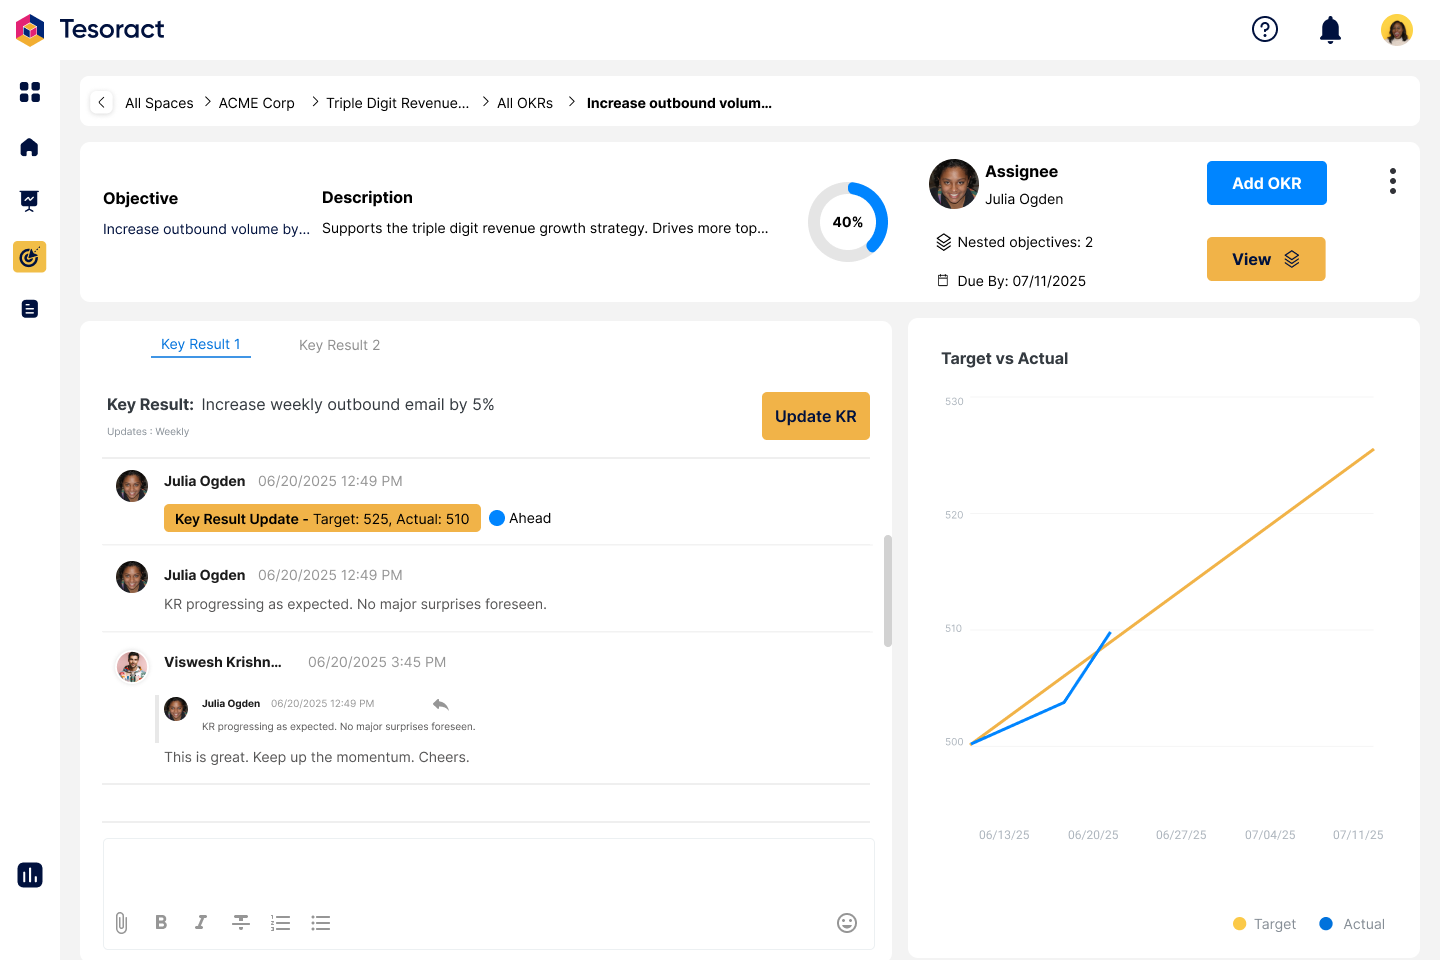
To update a key result, click the 'Update KR' button. In the pop-up, enter the 'Actual' progress, select the update date, add comments (optional), and choose a status (optional) based on the progress.
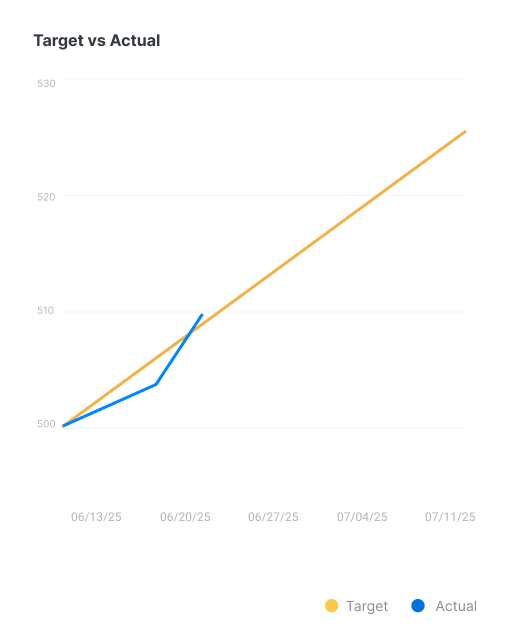
Interpreting the chart
The KR chart shows a “Target” line and an “Actual” line. The target line shows the ideal progress of the key result from the start date of the objective to the end date of the objective. The actual line updates with each key result update. Thus the chart shows a contrast between the expected progress of the key result and its actual key result allowing you to make adjustments to ensure the target is achieved by the due date of the objective.
Switching between KRs and Nested Objectives
To switch from KRs to nested objectives, click on the "View Nested Objectives" button (look for the button with the icon). To return to the KRs, click on the “View KRs” button. In case your OKR doesn’t have any nested objectives, view nested button will be greyed out. Conversely, if you don’t have any key results, the view KRs button will be greyed out.
Projects
Projects in Tesoract help mange outputs that support the strategy. Tesoract allows you to manage projects in the project management methodology of your choice. You can run projects in an agile way using sprints or sequentially without sprints. You can navigate to projects from either the "Projects" icon from the side bar or from the quick peek panel within strategy.

Add a Project
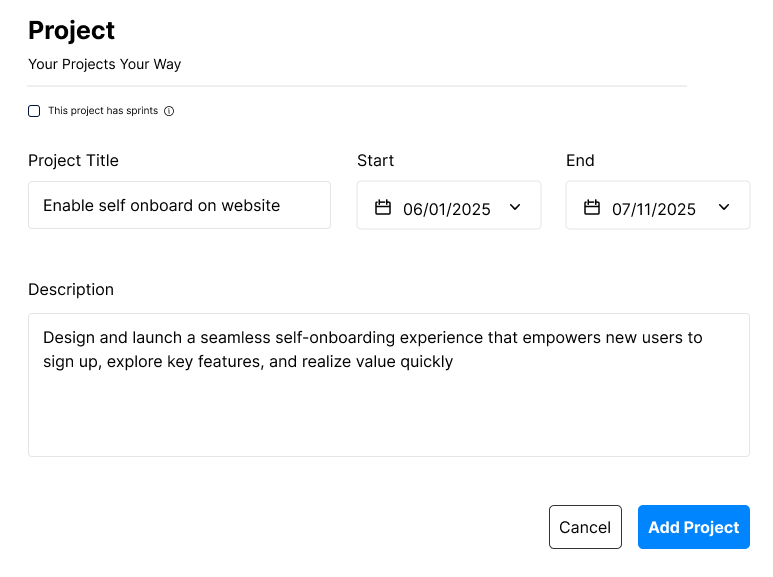
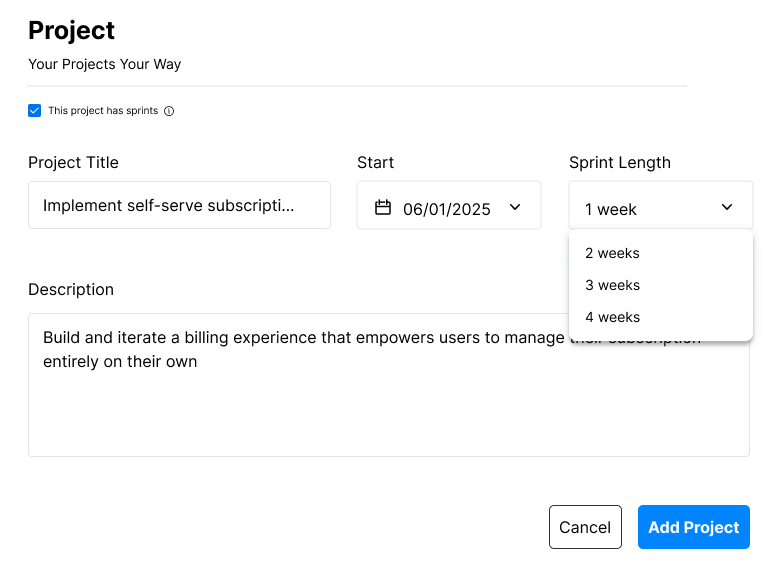
To add a project, click on the "Add Project" button. The following pop-up shows the necessary fields to create a project. Give your project a title, description, start and end dates. Should you decide to run an "Agile" project, click on the "This project has sprints" checkbox. When you do so, you don't have to give your project an end date. Instead, define sprint length. You may choose between 1, 2, 3 or 4 weeks. All projects can be seen in the "All Projects" page across the timeline. Click on the project you would like to enter.
Entering a Project
From the "All projects" page, click on the project you want to enter. All members of the strategy will gain access to all Ideas, OKRs and projects within the strategy. If you add new members to this project, they will have access only to this project and its tasks and not to any other Ideas, OKRs and Projects within the strategy.
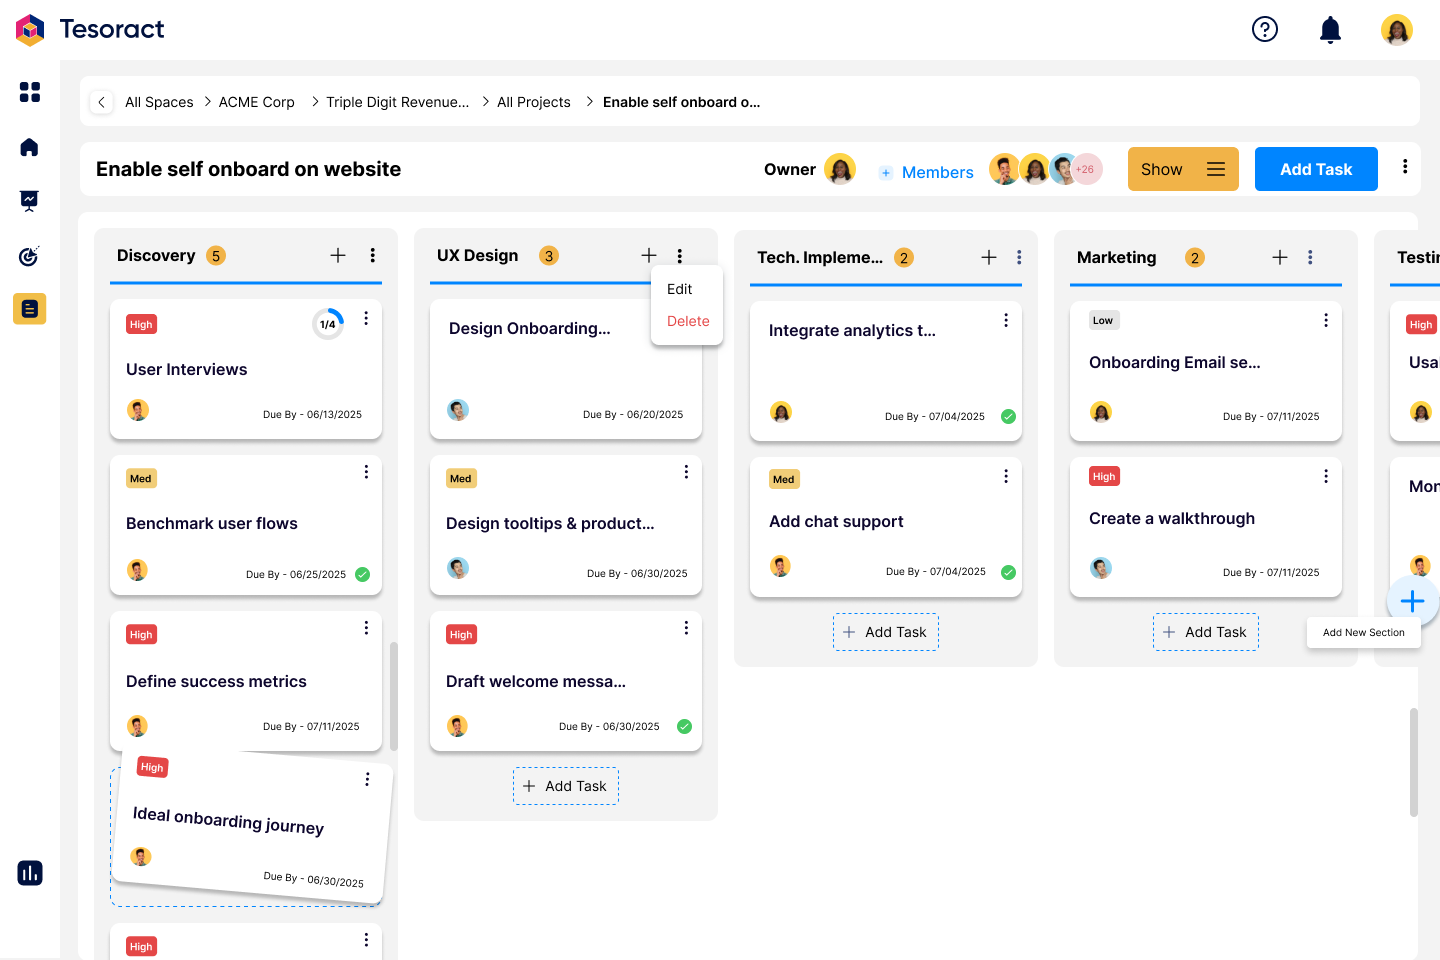
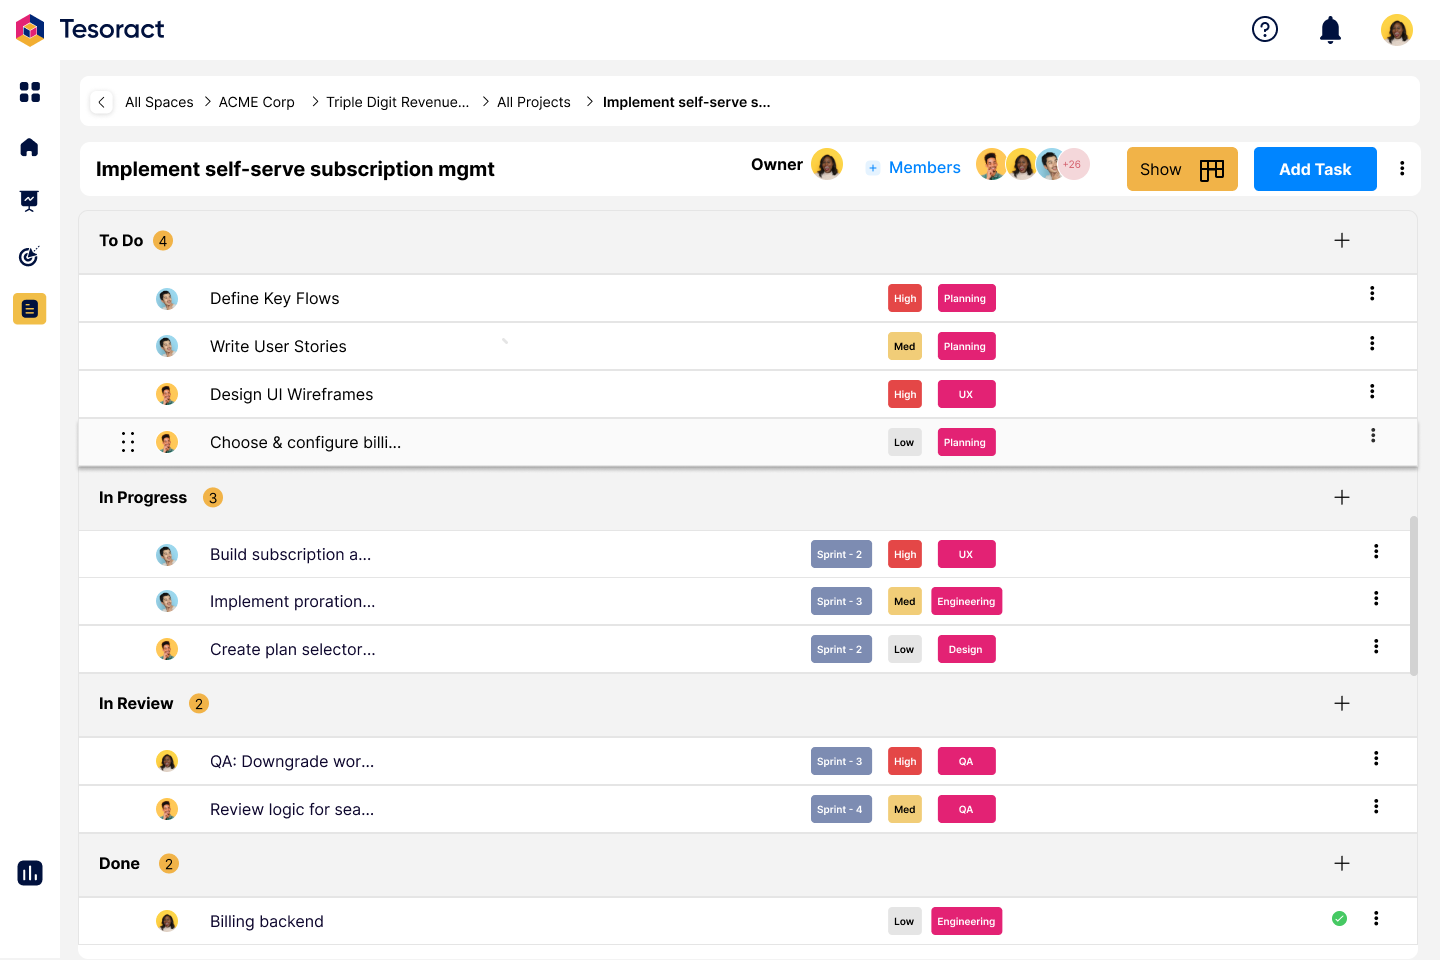
Every project is created with 4 sections by default. "To do", "In Progress", "In Review" and "Done". You can create tasks in your project and manage them across these sections. In projects without sprints, sections are fully customizable. You can set them up to reflect your project structure, such as "Marketing", "Design", "Sales", and "Customer Success", or organize them by project stages like "Ideate", "Build", "Launch", and "Optimize". You can also add new sections as needed to match your workflow. Projects with sprints follow an opinionated workflow where the sections are fixed and enforce task behavior, controlling how tasks are assigned, completed, or reopened as they move between the sections.
Projects Without Sprints
These are projects with scope and timelines defined clearly upfront. Use projects without sprints for efforts that require sequential or phased execution where iteration is minimal and predictability is key. Below example shows such a project with custom sections.
Projects With Sprints
These are iterative projects designed for fast feedback, continuous improvement and adaptability. Projects with sprints are best suited for product development, experimentation where priorities evolve, insights emerge along the way and shape the next course of action. Below example shows such a project with fixed sections.

Switching Views
Switch between the "Kanban board" and the "List" views by click on the "Show" button.

Adding Tasks
You can add a task in one of three ways.
- The “Add Task” button on the project header
- The "+" button next to the section name
- "Add Task" button in the bottom of each section
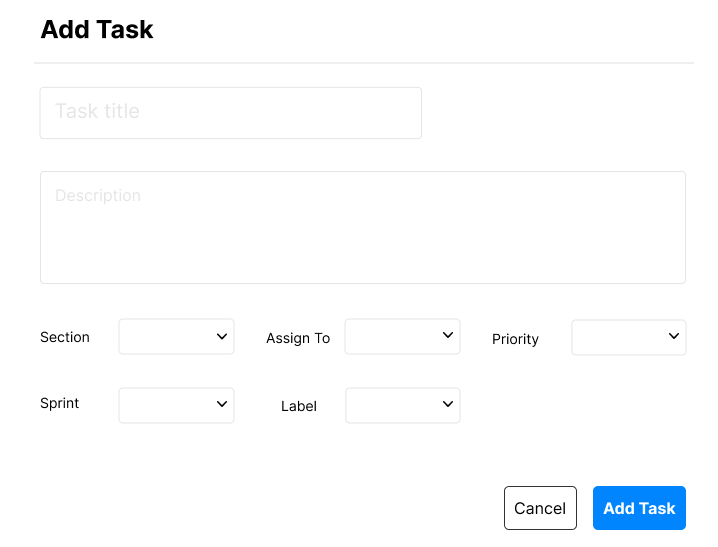
In the pop up that follows, provide the following details
- Title and Description
- Section to assign the task to
- Assignee (yourself or any member of the project)
- Priority level
- Labels (optional, for organizing tasks later)
Due Dates
- For projects without sprints, the task’s due date defaults to the project’s end date. You can modify this during task creation or later via the task editor.
- For projects with sprints, the due date automatically aligns with the end of the sprint the task is assigned to.

Viewing & Engaging with a Task
From the board view, click on the task card you want to enter. From the list view, click on the corresponding task row.
Each task opens in a dedicated workspace where you can,
- View and participate in the task-specific discussion thread
- Add comments, tag teammates, and track decisions
- Upload attachments or add links relevant to the task
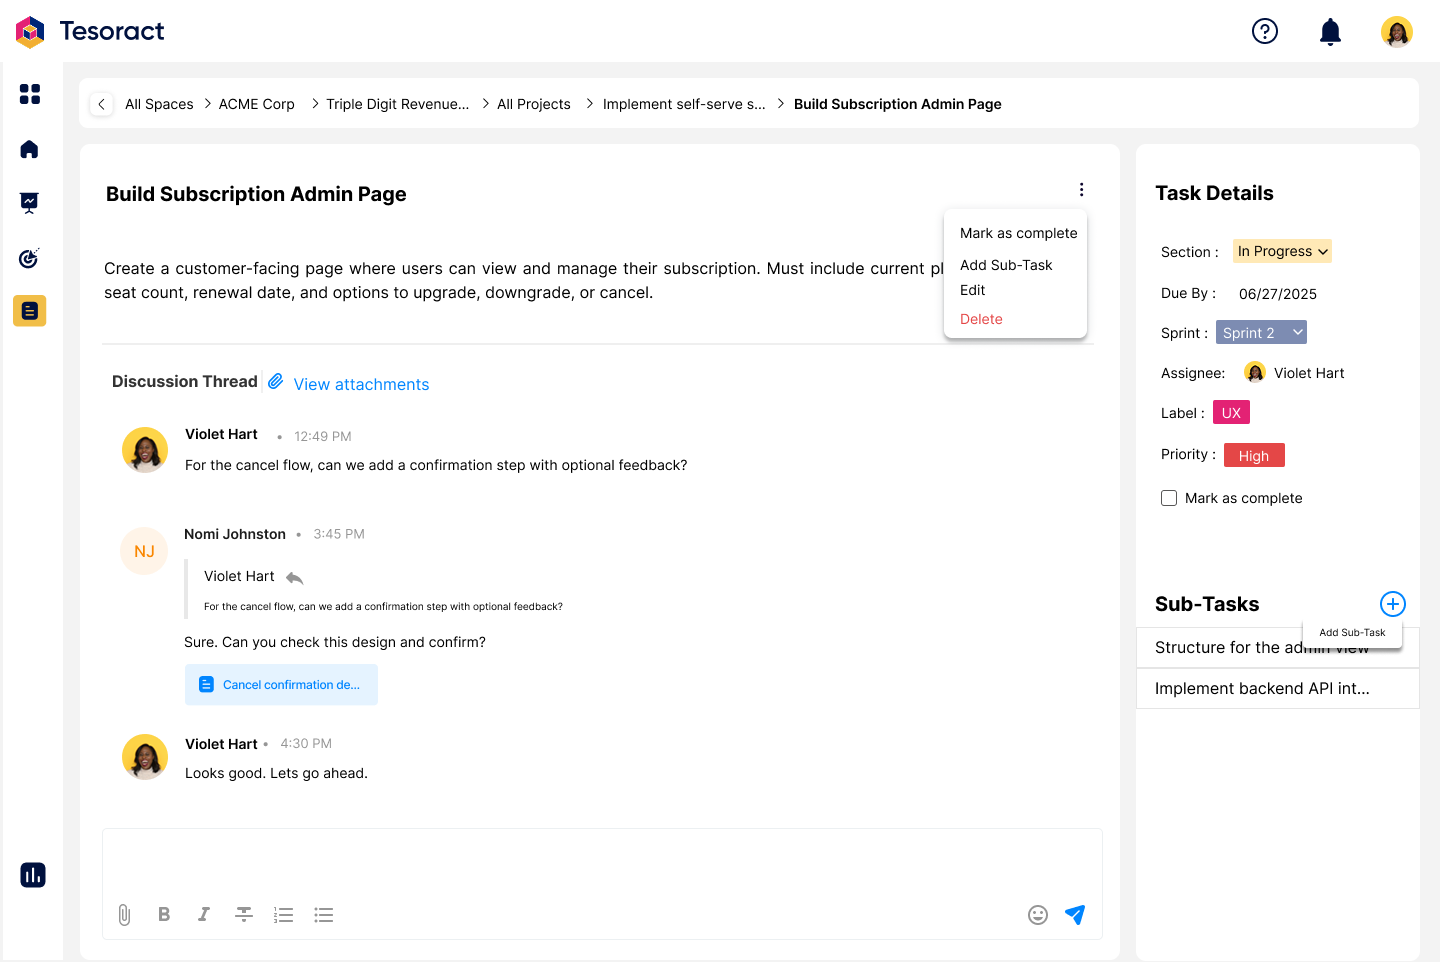
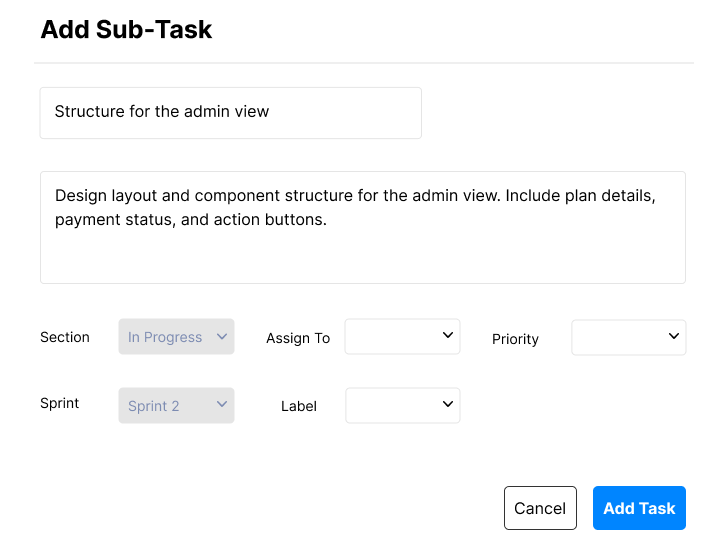
Sub-tasks
Large or complex tasks can easily become difficult to manage. Breaking them into sub-tasks helps teams stay focused, track progress more effectively, and collaborate with greater clarity. Tesoract currently supports one level of sub-tasks, meaning each task can have multiple sub-tasks, but sub-tasks cannot themselves have sub-tasks.
To add a sub-task, click on the "Add Sub-Task" button. In the pop-up that appears, provide the following details,
- Title and Description
- Assignee (yourself or any member of the project)
- Priority level
- Labels (optional, for organizing tasks later)
Sub-tasks inherit section and sprints or due dates from the parent task. Sub-tasks also show their parent task as seen below.

Moving tasks between sections
Tasks can be moved between sections in one of 3 ways,
- By clicking on the 3 vertical dots on the task card from the board view or list view, clicking on "Move to" and choosing the section to move to
- By dragging and dropping the task card from the board view or the list view
- On the task page, by choosing a different section under task details
For projects with sprints, tasks can be moved in the same 3 ways as above. Additionally, moving tasks in projects with sprints also control their sprint assignment,
- Task in "To do" - No sprint assigned
- Task moved out of "To do" - Assigned to current sprint
Completing a Task
For projects without sprints, tasks can be completed from any section. A task can be completed in one of three ways,
- By clicking on the 3 vertical dots on the task card from the board view or list view and choosing "mark as complete"
- On the task page, by clicking on the 3 vertical dots and choosing"mark as complete"
- On the task page, by clicking on the "Mark as complete" checkbox under task details
For projects with sprints, tasks can be completed in the same 3 ways as above. Additionally, completing a task also moves it to the "Done" section.
Project Progress
The project’s progress is calculated as “Tasks marked as complete / Total Tasks”.In case the project has sprints, the progress is shown for both the project andthe current sprint.
Dashboard
OKRs
You can navigate to the dashboard by clicking on the dashboard icon from any page within the space. Note that the dashboard shows data within a space. The dashboard has two tabs "OKRs" and "Projects". Below is an example of the "OKRs" tab.
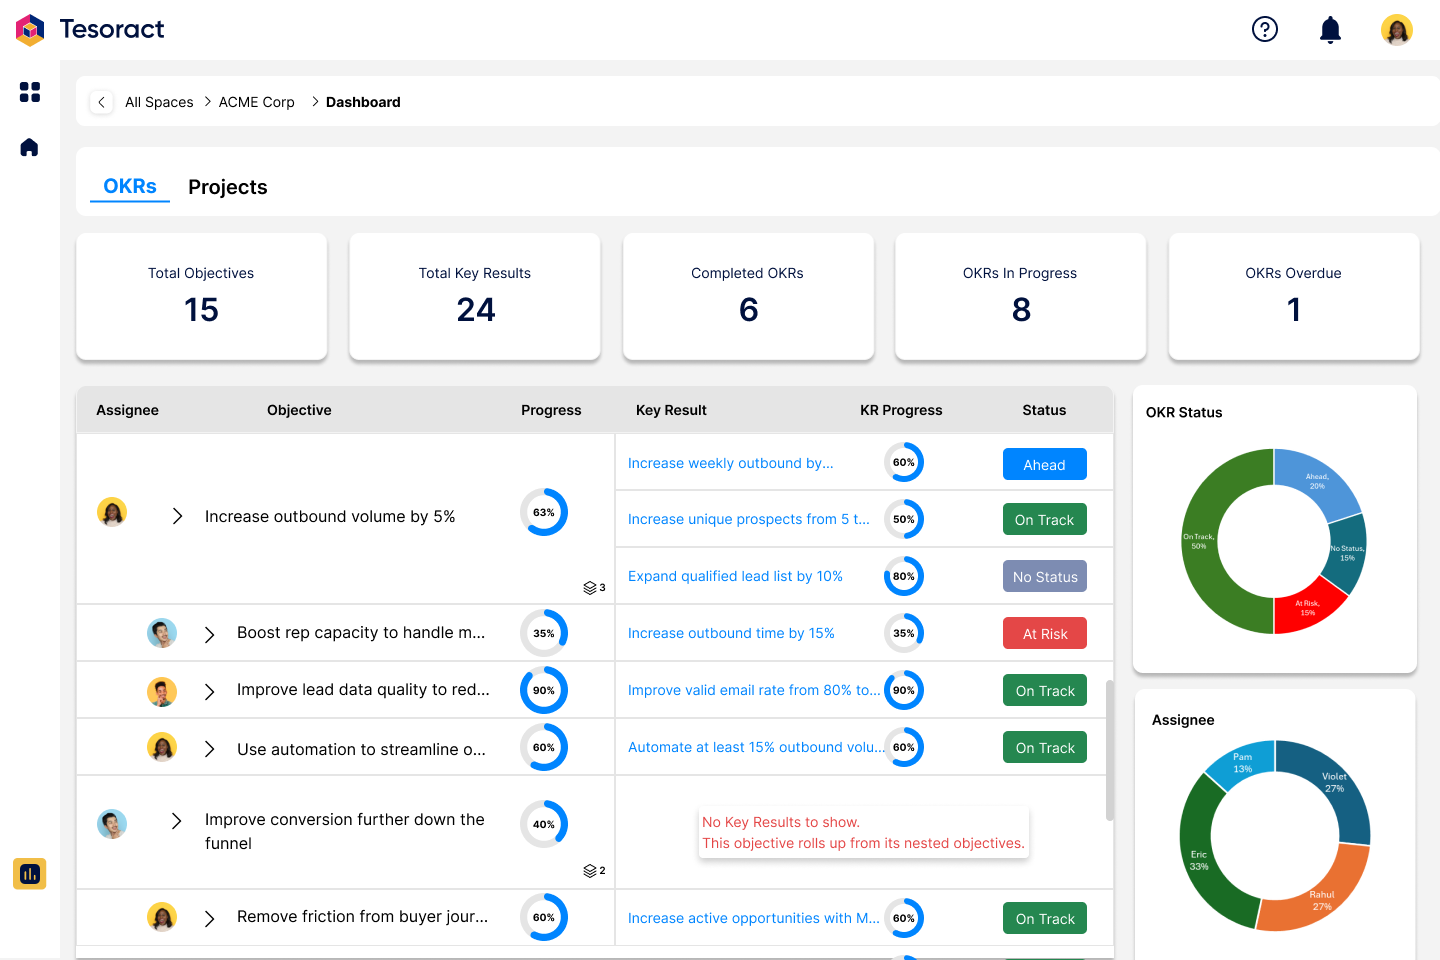
The OKR dashboard shows a quick snapshot of all OKRs the user has access to. You can click on any Key Result you want to dive deep into and go to the OKR details page. The dashboard also shows two pie charts, one showing distribution of OKRs by status and another by assignee.
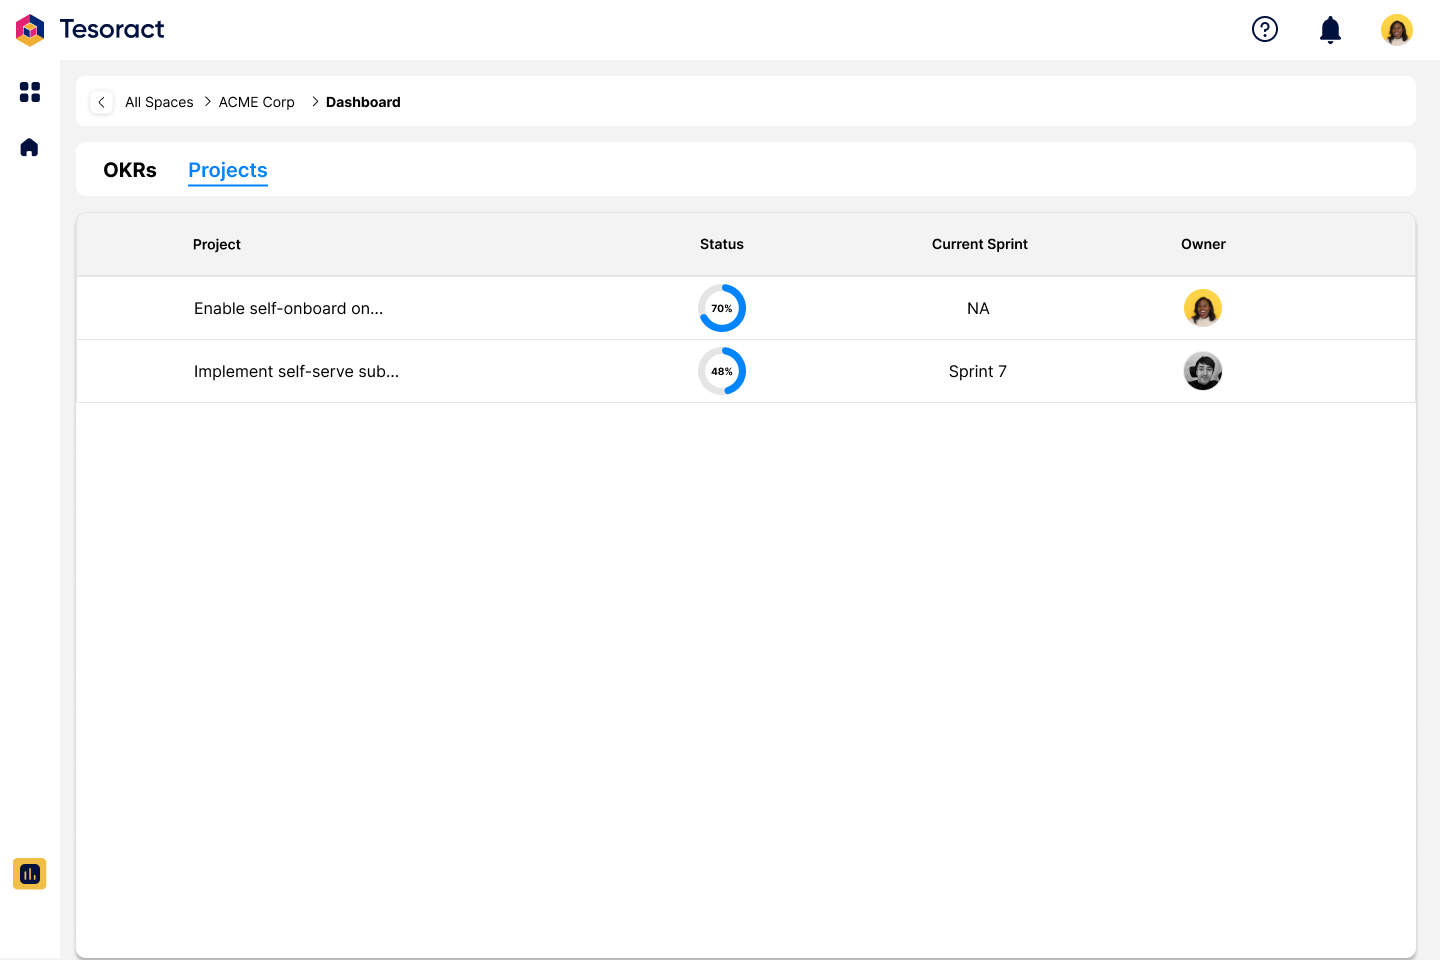
Projects
Click on the "Projects" tab to go to the project dashboard. From the list of projects, click on the project you want to enter.
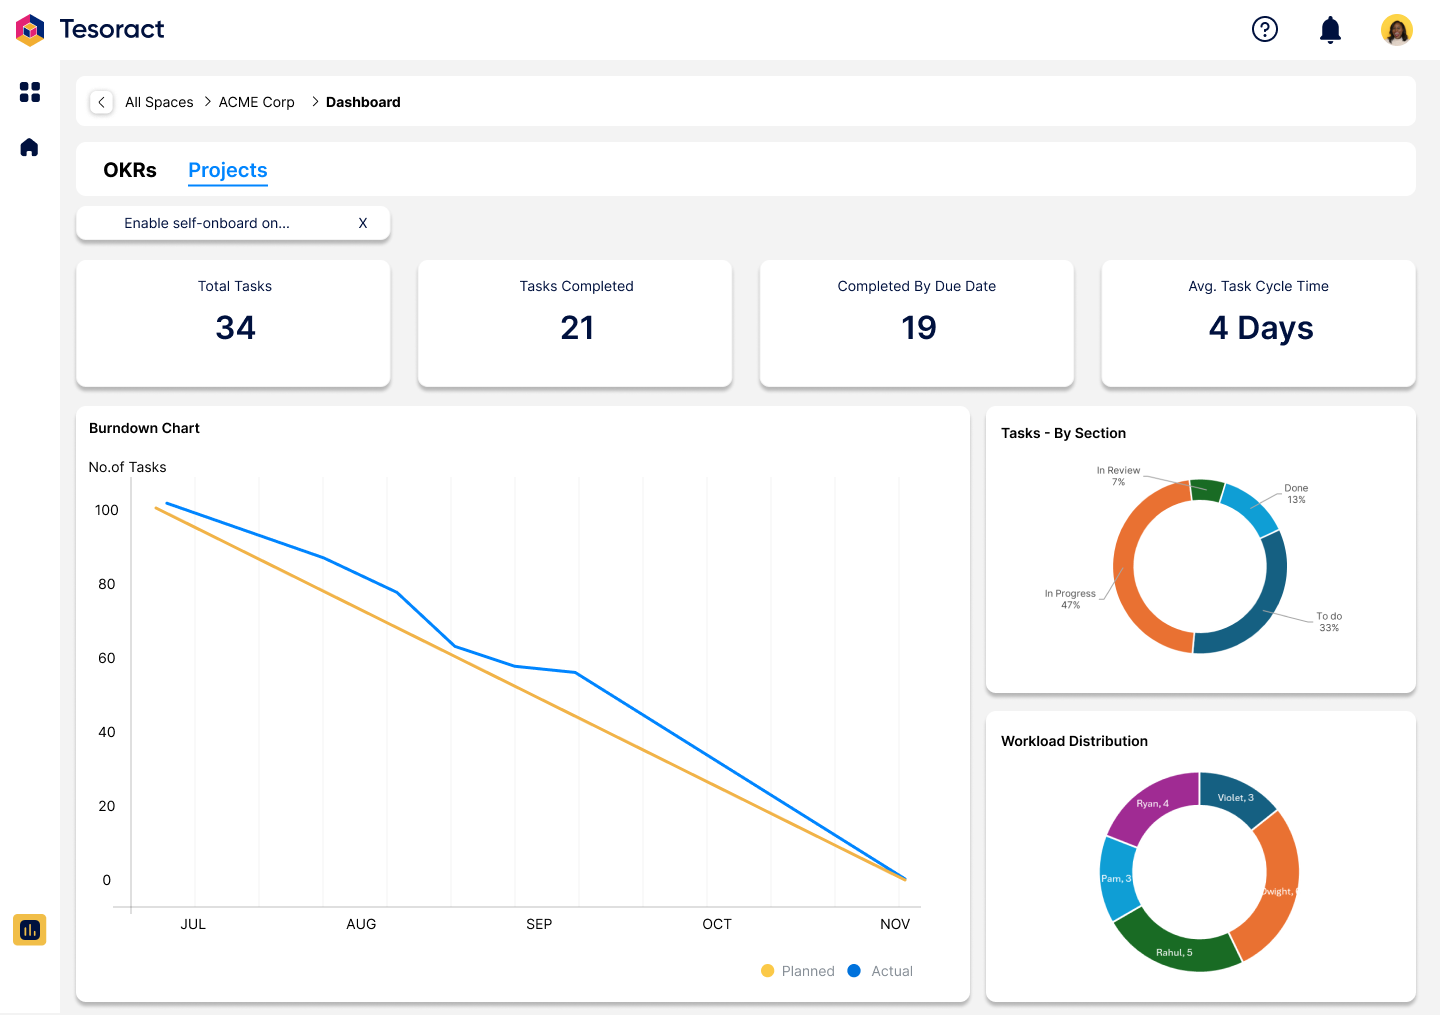
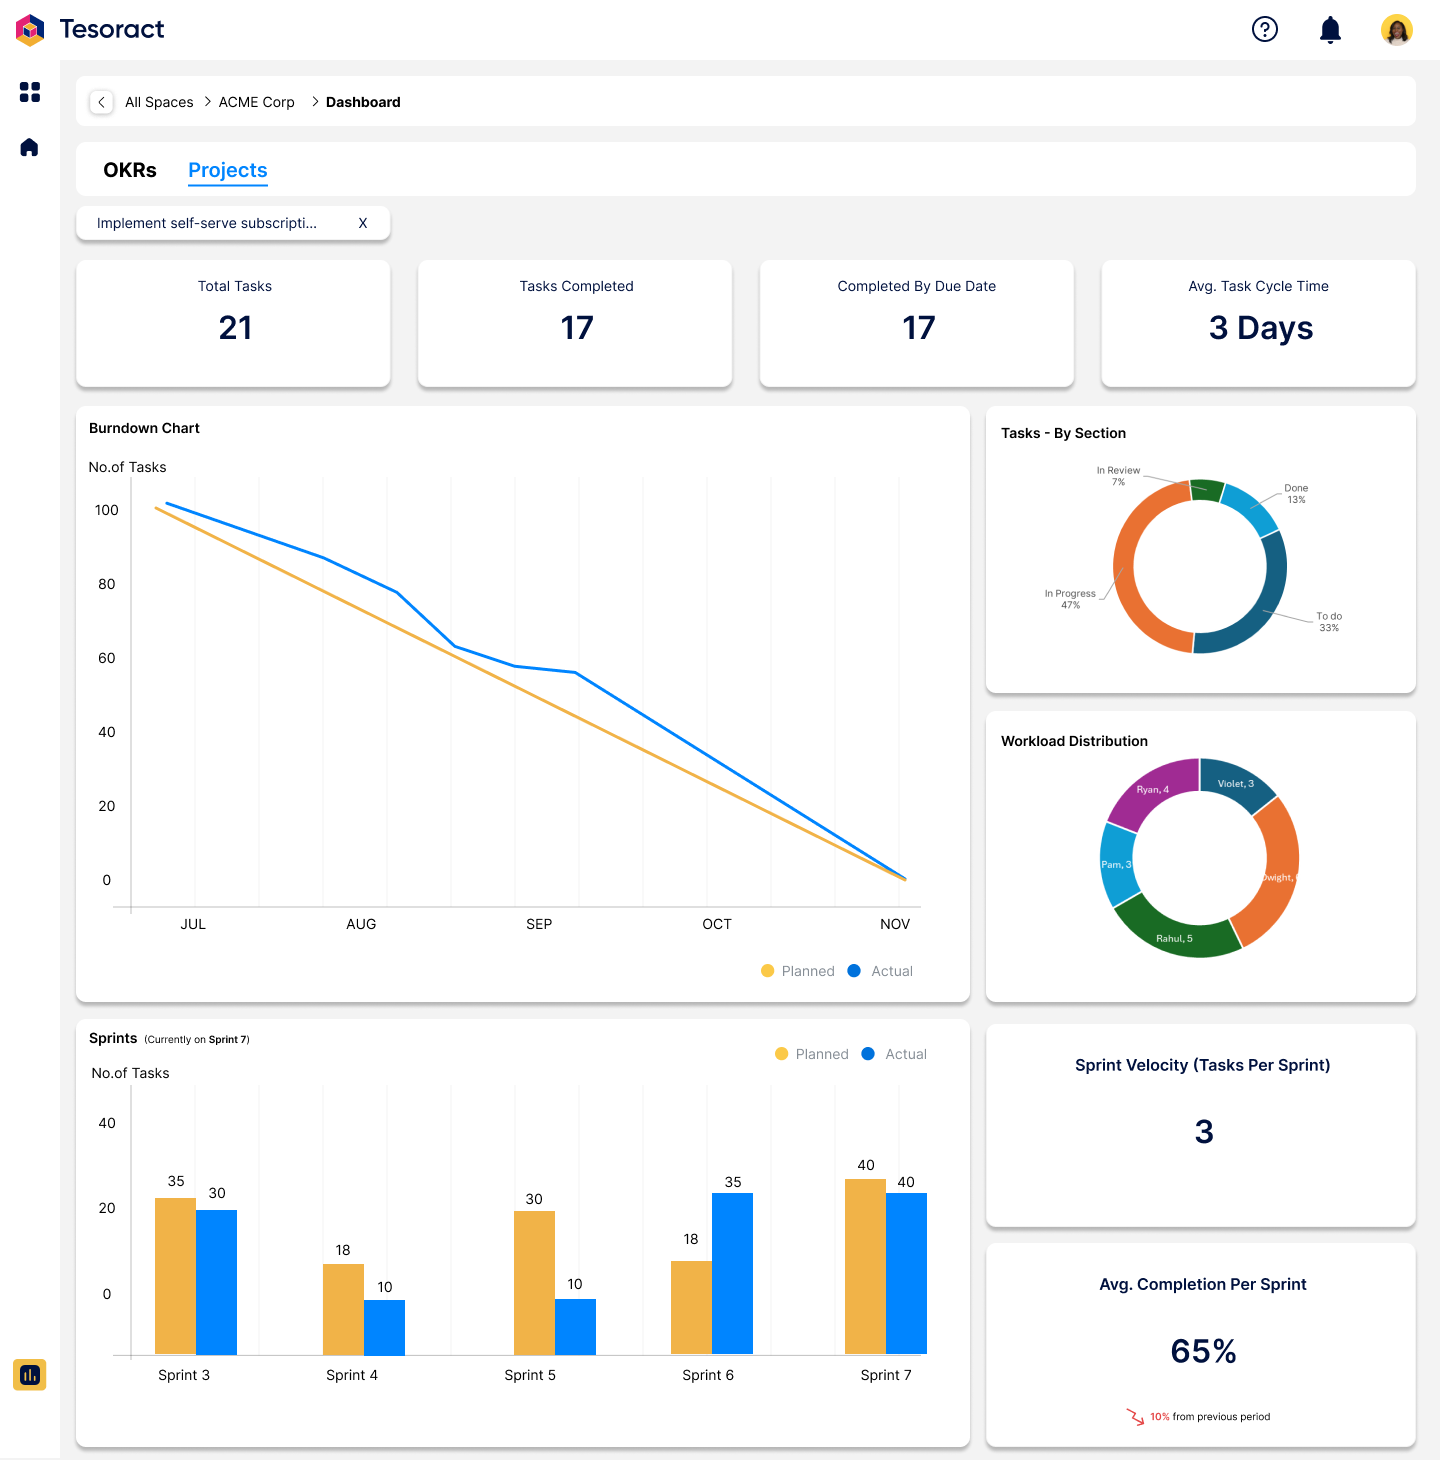
Once you are inside a project, you will see an overview of task progress and team performance within that project. It includes,
Summary section,
- Total tasks in the project
- Number of tasks completed
- Number of tasks completed within due date
- Avg. cycle time (The average time to complete a task)
Charts,
- Burndown chart - tasks remaining over time
- Pie chart showing task distribution by project sections
- Pie chart showing task distribution by assignees
If the project has sprints, you will also see,
- Column chart showing planned vs completed tasks by sprint
- Card showing sprint velocity (Tasks completed per sprint)
- Card showing average task completion percentage across sprints
Access
In Tesoract, user permissions are managed through two access levels, Full and Basic. These levels determine what users can see, do, and change within different areas of the app.
Full Access
- Grants complete privileges, including viewing, creating, editing, and deleting items
- Managing members at all levels
Basic Access
- Primarily read-only
- Users can, view content and participate in limited ways. E.g., participating in idea sessions, being assigned an OKR or to tasks in a project
Access Inheritance (Top-Down Model)
Access in Tesoract follows a top-down inheritance model. Access flows downward, meaning that a user with access to a higher-level item automatically gains access to all items nested beneath it. Permissions at lower levels do not elevate access upwards.
For example, if a user has
- Full access to space -> Gets full access to all strategies and all items within all strategies
- Full access to strategy -> Gets full access to the strategy and all items within the strategy. Gets basic access to the space.
This ensures that access always flows from parent to child, but not in reverse.
Points to Remember
- Full access at a higher level unlocks full privileges at all lower levels but full access at a lower level gets only basic access at higher levels
- Users with basic access cannot create or edit items, but may still participate (e.g., comment or mark something as done)
- Access can be explicitly set at any level, but inherited access always applies and cannot be overridden


